
How To Remove Skirting Boards | DIY Method | No Damage Technique
11th Apr 2025
How to Remove Skirting Boards
Removing skirting boards requires precision and patience. This guide provides professional methods for clean removal, protecting your walls, and alternative solutions when replacement seems daunting.
Shop Skirting CoversFor those concerned about potential wall damage or looking for a simpler solution, skirting board covers provide a cheaper, easier alternative – fitting over your old skirting without the need for removal.
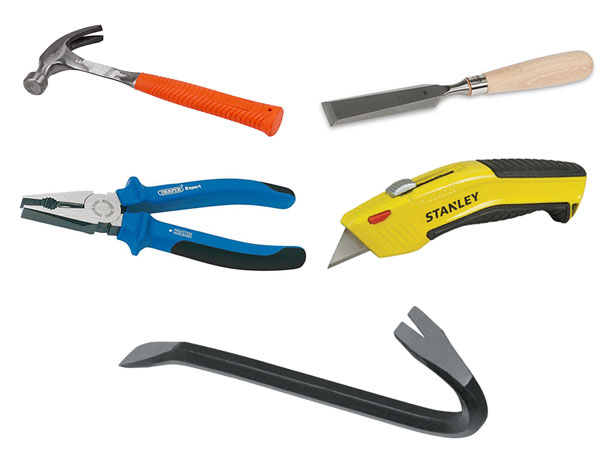
Tools Required
- Stanley knife/utility knife – For scoring paint seals and caulk lines
- Chisel – To create initial separation between wall and skirting
- Claw hammer – For general leverage and nail removal
- Crowbar/pry bar – Essential for controlled leverage when removing boards
- Pliers – For extracting remaining nails
- Protective wood block – Critical for protecting walls during prying
- Dust sheets – To protect floors and catch debris
- Safety glasses and gloves – Essential protection
For adhesive-fixed skirting, a multi-tool with a scraper attachment is brilliant for breaking the bond without wall damage.
Invest in quality tools! While more expensive initially, they offer substantial long-term value. Premium tools provide better control, reduce the risk of wall damage, and will serve you well for future projects.
Before You Start
Check for Electrical Cables and Pipes
In UK homes, cables are commonly tacked to the top edge of skirting boards, particularly in older properties. Carefully inspect for any wiring near the skirting before proceeding. Consider using a cable detector if you're uncertain. Also check for any radiator pipes that might run alongside or through the skirting (we can make your skirting with a rebate to hide cables and pipes.).
Clear and Protect the Area
Remove furniture from the wall or cover it thoroughly. Lay dust sheets to protect your flooring and catch debris. Whilst not the messiest job, you would be surprised by how much paint & MDF dust can be produced.
Identify the Fixing Method
Examine your skirting to determine how it's fixed to the wall – nails, screws, adhesive, or a combination. This will inform your approach to removal. Look for nail heads, filled screw holes, or signs of adhesive along the bottom edge (use a magnetic detector to find screws/nails).
Consider Wall Type
Different wall constructions require varying approaches. Plasterboard walls are more susceptible to damage than solid masonry, while lath and plaster (common in period properties) demands particular care. Identifying your wall type will help you adjust your technique accordingly.
Note: If you're planning to reuse the skirting boards, number each piece sequentially as you remove it, noting its location. This will simplify reassembly later. Consider also that in many cases, using skirting board covers might be a more practical solution than complete removal.
The Removal Process
Follow these methodical steps for controlled, damage-minimising skirting board removal. Patience is essential – rushing typically results in unnecessary wall damage.
Score the Paint Seal
Using a sharp Stanley knife, carefully cut along the top edge of the skirting where it meets the wall. This crucial step breaks the paint or caulk seal that typically forms between skirting and wall. Scoring prevents the wall paint or plaster from tearing away when the skirting is removed.
This step is essential for clean removal – don't skip it. Also score any vertical joints at corners or where skirting sections meet, like at architraves, mitres and plinth blocks.
Create Initial Separation
Starting at a corner or end point, gently tap a chisel between the skirting and wall using a hammer. Work along the length at approximately 15-25cm intervals, creating slight gaps. This gradually loosens the skirting before applying any significant prying force.
Work methodically along the board – attempting to remove the entire length from just one point increases the risk of damaging both the wall and the skirting.
Use Protective Levering
Before using your crowbar or pry bar, place a protective block of wood against the wall above the skirting. This spreads the force of the lever and prevents the tool from gouging or damaging the plaster. Insert the crowbar between the wall and skirting, leverage against the block, and apply steady, controlled pressure.
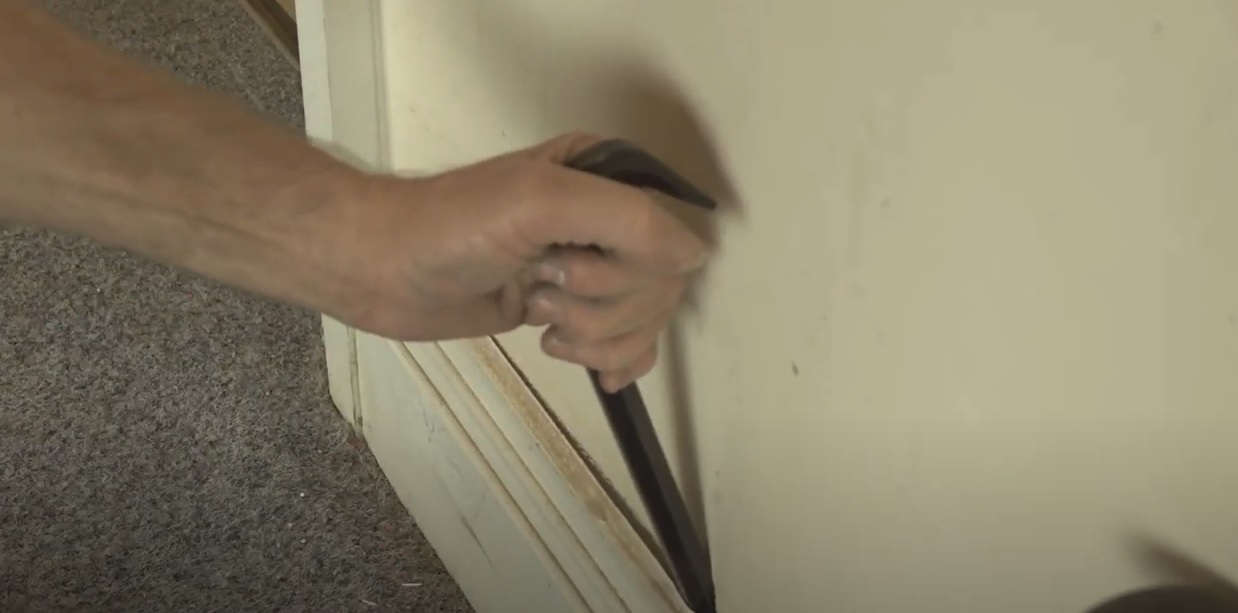
This protective block is non-negotiable for professional results – it significantly reduces wall damage during removal.
Work Progressively
Move the pry bar along the length of the skirting, working from the initial gap. Apply gentle leverage at regular intervals, gradually easing the board away from the wall. Continue until the entire length is sufficiently loosened from its fixings.
The key is progressive, controlled force rather than sudden, forceful movements that can snap the board or damage plaster.
Remove and Clean Up
Once the skirting is detached, carefully extract or hammer flat any remaining nails in the wall. If you encounter stubborn nails, use pliers to remove them or a claw hammer to lever them out (again, protecting the wall with a block). For screws, unscrew them or, if the heads are damaged, consider using a hacksaw to cut them flush with the wall.
Never hammer nails into the wall without checking for hidden pipes or cables behind them. If in doubt, cut them flush with a hacksaw or multi-tool instead.
Techniques for Different Fixing Types
Skirting boards may be attached using various fixing methods, each requiring a slightly different approach for removal. Understanding how your skirting is secured will help you adapt your technique appropriately.
If you encounter a combination of fixing methods (common in thorough installations), address each type – remove screws first if visible, then proceed with the prying technique, being mindful of potential adhesive resistance.
Wall Construction Types
The wall construction behind your skirting significantly impacts the removal process and risk of damage. UK homes typically feature three main wall types, each requiring specific adaptations to your technique.
For any wall type, treating the skirting removal as a delicate process rather than a demolition task will yield better results. Some minor wall damage is often inevitable, but proper technique significantly minimises the extent of repair needed afterward.
Special Scenarios
Certain situations require adjustments to the standard removal approach. Here are solutions for common special scenarios you might encounter.
Removing Skirting Without Lifting Carpets
It's possible to replace skirting boards without fully lifting fitted carpets, though it adds complexity to the task.
- Carpet Preparation: Carefully pull the carpet edge off the gripper rods along the wall in question. Gently roll or fold it back 15-20cm to expose the skirting.
- Protection: Slip a piece of hardboard or stiff card between the carpet edge and the wall to shield the carpet during removal.
- Standard Removal: Follow the main removal steps on the exposed skirting.
- Replacement: Install new skirting, then carefully re-stretch and press the carpet back onto the grippers.
- Complete Room Strategy: Work wall by wall, refitting the carpet after each section is completed.
For complex carpet installations or valuable carpets, consider consulting a professional carpet fitter. They have specialised tools like knee kickers and carpet tuckers to ensure proper refitting.
Removing a Section of Skirting Board
For partial removal (e.g., to accommodate built-in furniture or replace a damaged section), precision is key.
- Mark the Section: Use a pencil and spirit level to mark precise vertical lines where cuts will be made.
- Cut Vertically: Use one of these methods:
- Oscillating multi-tool with wood-cutting blade (cleanest method)
- Tenon saw or pull saw (may struggle to cut flush to floor)
- Drill a series of holes along the line and chisel between them (for situations without appropriate saws)
- Release the Section: Once cut on both sides, gently pry the section away from the wall using the standard technique.
- Clean the Edges: Smooth any rough edges on the remaining skirting with sandpaper or a sharp chisel.
An oscillating multi-tool is particularly valuable for these precision cuts, able to make clean, straight cuts flush with the floor and wall.
Period Properties and Listed Buildings
Older properties require special consideration due to their construction methods and potential protected status.
- Check for Listed Status: For listed buildings, consult your local conservation officer before removing original features, including skirting.
- Preservation Approach: Where possible, consider preserving and refurbishing original skirting rather than replacing it.
- Expect Challenges: Period properties often have skirting fixed with large cut nails into wooden blocks set in the wall – these can be extremely difficult to remove without damage.
- Wall Construction: Older properties frequently have fragile lime plaster or lath and plaster walls that demand gentler techniques.
- Matching Profiles: If replacement is necessary, source period-appropriate profiles that match the original style.
For historic properties, skirting board covers offer a non-destructive alternative to removal, preserving the original features while achieving a fresh appearance.
Removing Beading from Skirting
If your skirting has decorative quarter-round beading or scotia trim at the bottom, remove this first before tackling the main skirting board.
- Score along any paint seal between the beading and skirting (and floor if relevant).
- Using a thin pry tool or flat screwdriver, gently ease the beading away from the skirting.
- Work along the length, prying near nail positions to reduce splitting risk.
- Once removed, extract any remaining pins from the skirting or beading if you plan to reuse it.
Beading is typically attached with small panel pins or adhesive and is generally easier to remove than the main skirting board.
Skirting Board Covers: Everyone's Doing It!
If you're hesitant about removing your existing skirting – perhaps due to concerns about wall damage, the complexity of the task, or the potential disruption to fitted carpets – skirting board covers offer a new solution.
What Are Skirting Board Covers?
Skirting board covers are specially designed profiles that fit over your existing skirting boards. They feature a hollow rebate on the rear that accommodates the old skirting, effectively concealing it without the need for removal.
These covers provide all the benefits of new skirting – refreshed appearance, updated style, clean lines – without the potential wall damage, dust, and disruption associated with removal.
Available in various styles from Bullnose to Ogee and Torus, our covers can transform your interior without the hassle of traditional skirting replacement.

Key Benefits of Skirting Board Covers
-
No Wall Damage: Eliminates the risk of plaster damage or paint peeling associated with skirting removal.
-
Simple Installation: Significantly faster and easier than removing and replacing skirting boards – typically requiring just adhesive and basic tools.
-
Carpet-Friendly: Minimal disruption to fitted carpets, eliminating the need for carpet lifting and refitting.
-
Cable Management: The hollow space behind the covers can neatly conceal cables, providing an integrated cable management solution.
-
Period Property Solution: Ideal for historic homes where removing original skirting might damage fragile plaster or compromise the property's character.
-
Reversibility: The original skirting remains intact beneath the cover, allowing future restoration if desired.
"I want to reuse my old skirting"
We know that many homeowners love their original skirting boards, and simply want to remove them withotu damage to conduct renovation works, and then reinstall. With our bespoke skirting board matching service, you can make a 1:1 replica of your existing skirting boards for refitting! Contact our In-House Design Team to get started.
Ready to remove?
Removing skirting boards is a task that rewards methodical patience over brute force. The key to success lies in thorough preparation, understanding your specific wall and fixing types, and employing appropriate techniques for clean removal.
While skilled DIYers can successfully remove skirting with minimal damage, it's worth considering whether removal is truly necessary. For many situations – particularly in period properties, homes with fitted carpets, or where wall damage is a significant concern – skirting board covers offer a practical and elegant alternative.
Whether you choose to remove your old skirting or cover it with our premium MDF covers, the result can transform your interior and provide a fresh, refined finish to your rooms.