
How To Fit Architrave | DIY Guide
9th Oct 2025
Architrave fits around door frames to bridge the gap between the frame and plaster, covering rough edges while adding definition to the doorway. The process requires accurate measuring and precise mitre cuts, but follows a straightforward sequence once you understand the method.
Note: This guide covers single doorways. Double doors require additional head length and potentially different techniques for the centre join.
What You'll Need
Basic fitting requires surprisingly few tools. The critical piece of equipment is something to cut accurate mitres - either a mitre saw or a mitre box with a hand saw. Everything else is standard DIY kit.
Essential Tools
- Mitre box or mitre saw
- Tape measure
- Pencil
- Hammer
- Spirit level
- Hand saw (if using mitre box)
Materials
- Architrave lengths or set
- Lost head nails (38mm-50mm)
- Construction adhesive (optional)
- Decorators caulk
- Wood filler
The mitre saw makes the job considerably easier if you're doing multiple doors. A decent mitre box with a sharp saw works fine for one or two doorways, but the setup time adds up when you're fitting architrave throughout a house.
Working Out Quantities
Standard door frames are roughly 2000mm tall and 900mm wide (depending on your door size), but measure yours before ordering. You'll need two upright legs and one head piece per side of the door.
Our architrave sets contain 2 legs at 2440mm and 1 head at 1220mm - enough for one side of a standard doorway with material to spare.
Most internal door frames need about 2100mm for each upright and 1000mm for the head. The extra length in the set gives you room for mistakes and lets you position cuts to avoid any imperfections in the MDF.
Material calculation
For a single door with architrave on both sides:
- 2 sets cover both sides
- 4 upright legs (2 per side)
- 2 head pieces (1 per side)
Step-by-Step Instructions
The order matters here. Fit the first upright, then the head, then the second upright. This sequence lets you adjust the uprights if the mitres don't sit perfectly flush, which they rarely do on the first attempt.
Mark the reveal
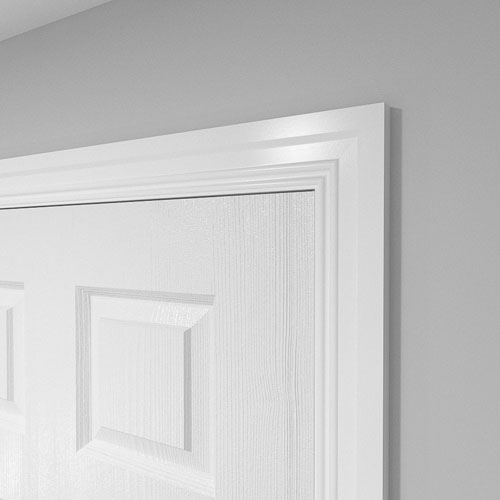
The architrave sits back from the edge of the door frame by 5-10mm. This reveal line needs marking on all three sides - both uprights and the head. Use a pencil to mark these parallel lines, checking they're consistent around the frame.
The reveal serves a practical purpose beyond aesthetics - it means you're nailing into the door lining rather than trying to fix into the plaster edge. Keep the reveal consistent; variations become obvious once the architrave is painted.
Cut and fit the first upright
Hold a length against the left side of the door, following your reveal line. Where the top reveal line crosses the architrave, mark precisely - this becomes the start of your mitre cut. The mitre angle is 45 degrees, cutting from the reveal mark outwards.
Cut with the saw blade just above your mark so you don't remove too much material. Place the mitred leg in position and secure it temporarily with a couple of nails near the bottom. Don't fix it fully yet - you might need to adjust once the head goes on.
Why start with a leg rather than the head: If you fit the head first and need to adjust the upright, you'll have to lift it slightly off the floor. This creates a gap that shows with hard flooring. Starting with the uprights avoids this problem.
Fit the head piece
Cut an opposing 45-degree mitre on a length suitable for the head. Hold it against the first upright's mitre to check the fit. Door linings are frequently out of square, so don't be surprised if the mitres don't meet perfectly. Make small adjustments to the mitre angle if needed.
Once the left side fits reasonably well, hold the head in position and mark where it meets the right side reveal line. Cut the second mitre, but don't fix the head yet - you need to fit the final upright first.
Cut and fit the second upright
Follow the same process as the first upright, but remember the mitre direction reverses. Hold the length against the right side reveal line, mark where it meets the head reveal, and cut the mitre.
Temporarily position the head and offer up the right upright to check the mitre fit. Make adjustments if needed. Once satisfied, fix all three pieces properly - roughly 6 nails per upright and 4 for the head, spacing them evenly.
Pin the mitres
To prevent the mitre joints opening over time, fix through both pieces where they meet. Drive a nail through the head down into each upright at an angle. The nail holes in the head won't be visible once filled and painted.
Punch all nail heads below the surface using a nail punch. Fill the holes with wood filler, let it dry, then sand flush before painting. Run a bead of decorators caulk along the back edge where the architrave meets the wall to create a neat seal.
Dealing with Poor Door Frames
Most internal door frames aren't perfectly square. The linings twist, the reveals don't run parallel, and the corners rarely meet at exact right angles. This is normal, not a sign you're doing something wrong.
Mitres won't close
The door frame isn't square. Rather than trying to force the architrave to sit flat, adjust the mitre angles slightly. Cut one face of the mitre a degree or two steeper until the joint closes. This is why you cut just above your mark rather than on it - it gives you room to adjust.
Gaps behind architrave
The wall isn't flat or the plaster sits proud of the frame. Pack out the back of the architrave with thin strips of timber or card where needed. Use construction adhesive to fill minor gaps - it acts as both glue and void filler.
Different architrave and skirting thickness
If your architrave is thicker than your skirting board, the skirting will butt into the architrave edge at floor level. Use plinth blocks at the base of each upright to bridge the thickness difference and create a neat transition.
Adhesive, Nails, or Both?
Nails alone work fine for architrave. The architrave isn't supporting any weight and the reveal means you're fixing into solid timber rather than plaster. That said, adding construction adhesive gives a stronger fixing and helps close any minor gaps behind the architrave.
Using adhesive effectively
Apply a continuous bead of construction adhesive to the back of the architrave before positioning. The nails hold it in place while the adhesive cures. Use a grab adhesive that sets quickly - standard wood adhesive takes too long and the architrave can shift.
Don't rely on adhesive alone. You need the nails to pull the architrave tight to the frame while the adhesive sets, and they provide the primary mechanical fixing.
Finishing for Painting
MDF architrave needs proper preparation before painting. Fill all nail holes with wood filler, let it dry completely, then sand flush. The joint between architrave and wall needs caulking - use decorators caulk, not silicone, as it takes paint.
Prime the MDF before topcoating. MDF is porous and will absorb your topcoat unevenly without proper priming, leaving a patchy finish that shows through subsequent coats.
Our primed or undercoated architrave arrives ready for topcoat, saving preparation time. If you've ordered unprimed MDF, apply a proper MDF primer rather than using your topcoat paint as the first layer.
Time and Cost
Fitting architrave around a single doorway takes about an hour once you've done a few. The first one always takes longer as you work out the sequence and get used to cutting accurate mitres.
Professional joiners charge roughly £80-120 per door for supply and fit, so doing it yourself saves a substantial amount on a whole house. The technique isn't difficult - it just requires patience and accurate measuring.
Common Questions
Can I reuse existing architrave?
Removing architrave usually damages it - the nails pull through the face or it splits where it was fixed. If you're replacing doors, budget for new architrave as well. The exception is period mouldings in good condition, which are worth the effort to remove carefully using a thin blade to separate the architrave from the frame.
Do I need the same profile as my skirting?
Matching profiles create visual continuity, but it's not mandatory. Many people run simpler architrave with more decorative skirting, or vice versa. The thickness matters more than the profile - if the architrave and skirting are similar thickness, they'll meet neatly at floor level without needing plinth blocks.
What size reveal should I use?
5-10mm works for most situations. Smaller reveals look neater but give you less fixing area. Larger reveals can look clumsy, particularly on narrow architrave. Keep the reveal consistent around each door - variations become obvious once painted.
How do I fit architrave with radiator pipes?
Measure where the pipes meet the architrave line and mark their positions. Drill holes slightly larger than the pipe diameter, then cut from the back of the architrave to the hole so you can slip it over the pipe. The skirting board should cover this cut when it butts against the architrave.