
How To Cut MDF | With & Without Power Tools | Hand Technique
Posted by Skirting World on 22nd Aug 2024

Introduction
Medium-density fibreboard (MDF) is a versatile material that has revolutionised the world of DIY and professional woodworking. Its uniform density and smooth surface make it an excellent choice for a wide range of projects, from skirting boards to custom furniture. However, working with MDF requires specific techniques and tools to achieve the best results. This comprehensive guide will equip you with the knowledge and skills needed to cut MDF like a pro, ensuring your projects are a resounding success.
What is MDF?
Before diving into cutting techniques, it's crucial to understand the material we're working with. MDF is an engineered wood product made by breaking down hardwood or softwood residuals into wood fibres, combining them with wax and resin, and forming panels under high temperature and pressure. This process results in a dense, flat, and stiff board that is uniform and smooth on both sides.
For a more in-depth look at MDF and its properties, check out our article on What is MDF?
Key Properties of MDF:
- Uniform density throughout the board
- Smooth surface ideal for painting or veneering
- No knots or grain patterns
- Excellent screw-holding ability
- May be susceptible to moisture and humidity
Tools & Specifications
Having the right tools is crucial for achieving clean, precise cuts in MDF. Here's a comprehensive list of tools you'll need, along with their specific applications:
Circular Saw
Best for: Long, straight cuts and breaking down large MDF sheets
- Use a fine-toothed blade (60-80 teeth - for thicker MDF use fewer teeth (40-60) to prevent overheating from too much friction)
- Carbide-tipped blades offer the best performance
- Consider a track saw for exceptionally straight cuts
Jigsaw
Best for: Curved cuts and intricate shapes
- Use a fine-tooth blade (12-14 TPI)
- Opt for a blade with downward-pointing teeth
- A pendulum action can speed up cutting but may reduce precision
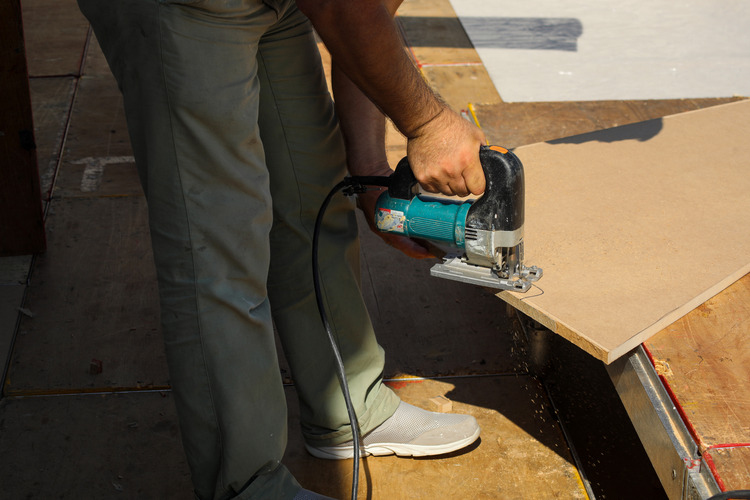
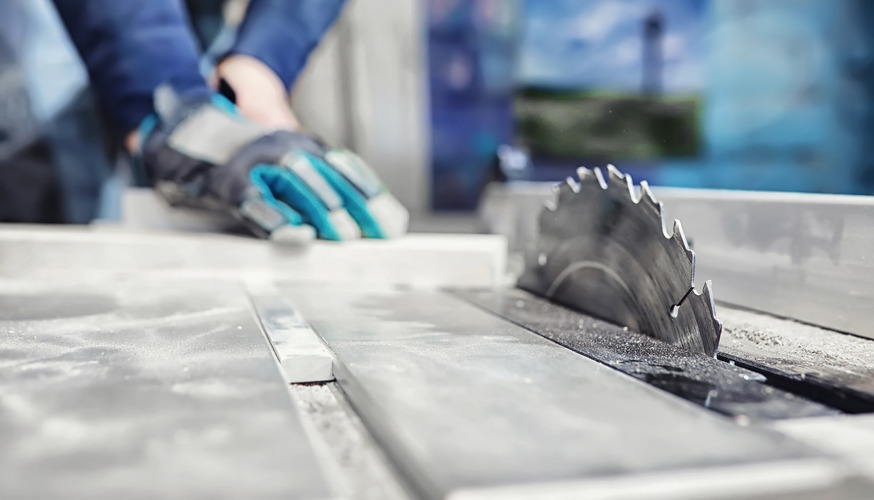
Table Saw
Best for: Precise, repeatable cuts and ripping MDF sheets
- Use a blade with 60-80 teeth for the smoothest cuts
- A zero-clearance insert helps prevent chip-out
- Ensure proper dust collection for a cleaner work environment
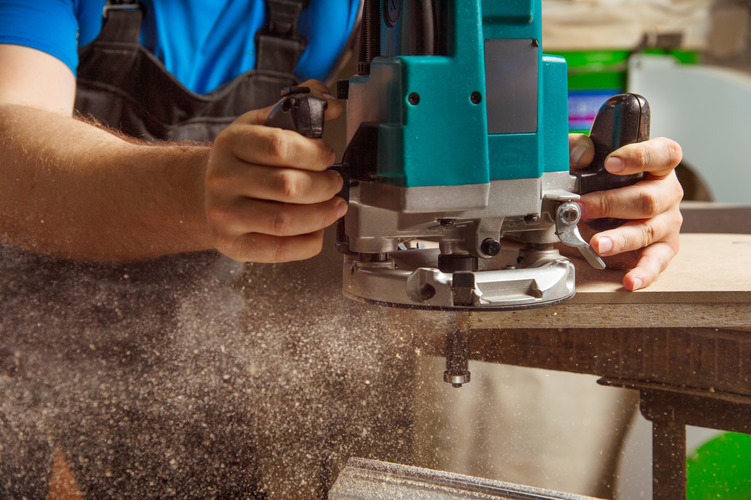
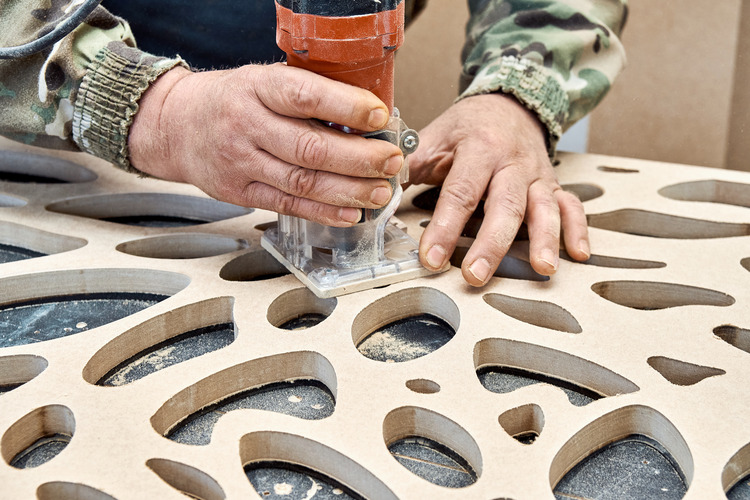
Router
Best for: Edge treatments, dadoes, and intricate patterns
- Use carbide-tipped bits for longevity
- A spiral upcut bit provides clean edges in MDF
- Consider a dust collection attachment for cleaner operation
For more specialised cuts, consider these additional tools:
- Oscillating Multi-Tool: Great for plunge cuts and tight spaces
- Hand Saw: Useful for small, quick cuts or when power tools aren't available
- Track Saw: Ideal for long, perfectly straight cuts in large MDF sheets
Remember, the quality of your tools can significantly impact the outcome of your project. Invest in good-quality blades and keep them sharp for the best results.
Cutting Techniques
Using a Circular Saw
- Measure and mark your cutting line clearly on the MDF surface.
- Secure a straight edge or level as a guide for your saw. Clamp it firmly to prevent slippage.
- Set the blade depth to protrude about 3mm through the MDF. This minimises tear-out on the bottom side.
- Start the cut slowly to establish a clean edge, then maintain steady pressure and speed throughout the cut.
- For exceptionally clean cuts, score the cutting line with a utility knife before sawing.
Jigsaw Cutting
- For interior cuts, drill a starter hole large enough for your blade.
- Use masking tape along both sides of the cut line to reduce splintering.
- Cut slowly with controlled movements for the best accuracy. Let the blade do the work - don't force it.
- When cutting curves, use relief cuts (perpendicular cuts up to your cutting line) to help navigate tight turns.
Table Saw Techniques
- Ensure your fence is properly aligned for straight cuts.
- Use a push stick to keep your hands safe when making narrow cuts.
- For large sheets, use infeed and outfeed support to prevent sagging and ensure a consistent cut.
- When possible, position the good side of the MDF face-up to minimise tear-out on the visible surface.
Routing MDF
- Always route in multiple passes, removing small amounts of material each time (6mm or less each time - to prevent burning the MDF).
- Move the router against the rotation of the bit (left to right for handheld routing).
- Use a template and guide bushing for repeatable, precise cuts.
- Consider using a router table for edge profiling and consistent results.
Pro Tip: Cutting 3mm MDF
When working with thin 3mm MDF, extra care is needed to prevent warping and tear-out:
- Use a sacrificial backing board to support the MDF during cutting.
- Opt for a fine-toothed blade or a dedicated thin material blade.
- Apply masking tape on both sides of the cut line for cleaner edges.
- Consider using a utility knife and a straight edge for very straight cuts in thin MDF.
Hand Cutting MDF
While power tools are often preferred for cutting MDF, hand cutting can be useful for small projects or when precision is required in tight spaces. Here's how to effectively cut MDF by hand:
Tools for Hand Cutting MDF
- Hand Saw: Use a fine-toothed saw (at least 11 TPI) for smoother cuts.
- Coping Saw: Ideal for curved cuts and intricate shapes.
- Utility Knife: For scoring and cutting thin MDF sheets.
- Sandpaper: To smooth edges after cutting.
Techniques for Hand Cutting MDF
- Mark your cutting line clearly using a sharp pencil and a straight edge.
- For straight cuts with a hand saw:
- Clamp a straight edge guide along your cutting line.
- Start the cut slowly to establish a groove.
- Use long, smooth strokes, letting the weight of the saw do the work.
- Keep the saw at a 45-degree angle for better control.
- For curved cuts with a coping saw:
- Drill a starter hole if cutting an interior shape.
- Insert the blade and tighten it in the frame.
- Cut slowly, following your marked line.
- Turn the blade to navigate tight curves.
- For thin MDF (3mm or less) with a utility knife:
- Score along the cutting line multiple times, applying firm pressure.
- Once deeply scored, carefully snap the MDF along the line.
Pro Tips for Hand Cutting MDF:
- Use masking tape along the cut line to reduce splintering.
- Support the MDF sheet fully to prevent bending and cracking.
- For long cuts, periodically stop and clamp the cut section to prevent binding.
- Always cut on the waste side of your line, leaving room for final sanding.

Safety Precautions
Working with MDF requires strict adherence to safety protocols. The fine dust produced when cutting MDF can be harmful if inhaled, and the tools used pose their own risks. Follow these safety measures to protect yourself:
Essential Safety Gear:
- Dust Mask or Respirator: Always wear a properly fitted dust mask or respirator rated for fine particulates (N95 or P100).
- Safety Glasses: Protect your eyes from flying debris and dust.
- Ear Protection: Use earplugs or earmuffs when operating loud power tools.
- Work Gloves: Protect your hands from splinters and sharp edges when handling MDF sheets.
Workspace Safety:
- Ensure proper ventilation in your work area. If possible, work outdoors or use a dust extraction system.
- Keep your workspace clean and free of clutter to prevent tripping hazards.
- Secure the MDF sheet properly to prevent kickback or binding during cutting.
- Never remove safety guards from power tools.
Tool Safety:
- Always unplug tools when changing blades or bits.
- Inspect tools and blades for damage before use.
- Let the tool reach full speed before beginning to cut.
- Never force a tool; let it do the work at its own pace.
For more information on working safely with MDF, please read our article on Is MDF Safe?
Edge Finishing Techniques
Properly finishing the edges of cut MDF is crucial for both aesthetics and durability. Here are some techniques to achieve professional-looking edges:
Sanding
- Start with 120-grit sandpaper to remove any roughness.
- Progress to 220-grit for a smoother finish.
- Use a sanding block to keep edges straight and even.
- Wipe away dust with a tack cloth between grits.
Sealing
Sealing MDF edges is essential to prevent moisture absorption:
- Apply a thin layer of PVA glue and let it dry completely.
- Use a specialised MDF sealer for better results.
- For painted projects, use a shellac-based primer before painting.
Edge Banding
For a polished look on visible edges:
- Choose iron-on edge banding that matches your MDF thickness.
- Cut the banding slightly longer than needed.
- Iron the banding onto the edge, moving slowly and applying firm pressure.
- Trim excess with a sharp utility knife or edge trimmer.
- Sand lightly to blend the edges seamlessly.
Routing
For decorative edges or to hide imperfections:
- Use a router with a roundover or chamfer bit for a professional finish.
- Make multiple passes, removing small amounts of material each time.
- Sand the routed edge to remove any fuzz or roughness.
Edge Finishing Tips:
- Always work in a well-ventilated area when sanding or sealing MDF.
- For painted projects, consider using wood filler on edges before priming for an ultra-smooth finish.
- When edge banding, slightly overhang the banding on both faces and sand flush for a perfect edge.
Pro Tips for Perfect MDF Cuts
- Always cut MDF with the good side facing up to minimise chipping on the visible surface.
- For exceptionally clean edges, apply masking tape along the cut line on both sides before cutting.
- Sand cut edges lightly with 220-grit sandpaper to remove any roughness.
- When cutting thin MDF (3mm or less), place it on a sacrificial board to reduce tear-out.
- For precise circular cuts, use a router with a circle-cutting jig.
- Pre-drill holes for screws to prevent the MDF from splitting.
- Use a sealer on cut edges before painting to prevent excessive absorption and swelling.
For more expert advice on working with MDF, visit our blog.
Speciality Cuts in MDF
MDF's versatility allows for various speciality cuts to enhance your projects. Here are some techniques for creating unique features in MDF:
Dados and Grooves
- Use a table saw with a dado blade set for wide grooves.
- For narrower grooves, make multiple passes with a standard blade.
- A router with a straight bit can create precise dados and grooves.
- Always test your cut depth on scrap MDF first.
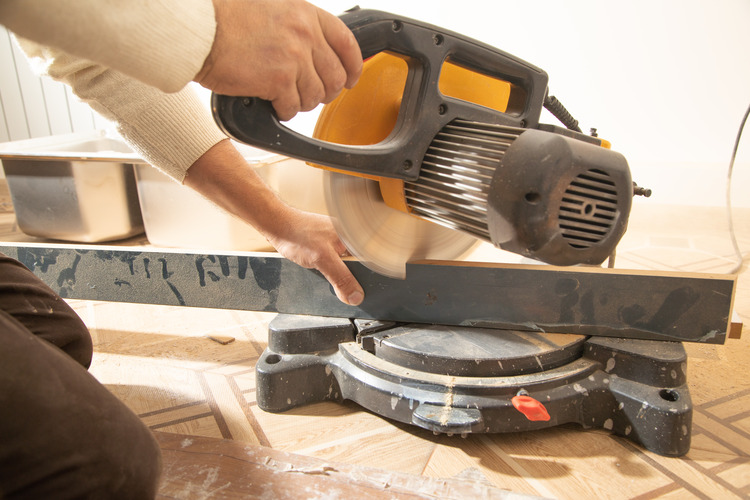
Mitred Corners
- Set your mitre saw or table saw to a 45-degree angle for basic mitres.
- Use a sharp blade to prevent tear-out on the face of the MDF.
- For picture frames or boxes, consider using a dedicated mitre jig for accuracy.
Pocket Holes
Pocket holes are great for joining MDF pieces:
- Use a pocket hole jig for consistent, angled holes.
- Set the depth collar on your drill bit to prevent breakthrough.
- Use coarse-thread pocket hole screws designed for MDF.
- Apply glue to the joint for added strength.
Circular Cuts
- For large circles, use a router with a circle-cutting jig.
- For smaller circles, a hole saw attachment on a drill works well.
- Use a jigsaw for freehand curves, following a drawn line.
Speciality Cutting Tips:
- When cutting dados or grooves, make multiple shallow passes instead of one deep cut to reduce tear-out.
- For cleaner mitred corners, apply masking tape to the cut line before cutting.
- When making pocket holes, use a scrap piece of wood underneath to prevent blow-out on the exit side.
Troubleshooting Common Issues
- Excessive Chipping:
- Use a zero-clearance insert on your table saw, opt for a finer-toothed blade, or score the cut line before sawing.
- Burn Marks:
- Reduce feed rate, check if your blade needs cleaning or replacement, or use a blade lubricant.
- Uneven Cuts:
- Ensure your cutting guide is securely clamped, check tool alignment, and maintain steady pressure throughout the cut.
- Tear-out on Bottom Edge:
- Use a backer board, adjust blade height to barely exceed material thickness, or apply masking tape to the bottom side.
- Warping After Cutting:
- Store MDF flat and in a dry environment. Consider sealing all surfaces, including edges, to prevent moisture absorption.
Frequently Asked Questions
Can you cut MDF with a utility knife?
Yes, you can cut thin MDF (3mm or less) with a utility knife. Score the line multiple times, then snap the board along the scored line. For thicker MDF, a utility knife can be used to score the cut line before sawing to reduce chipping.
How do you cut MDF without chipping?
To minimise chipping: use a fine-toothed blade, apply masking tape along the cut line, score the line before cutting, use a zero-clearance insert on table saws, and always cut with the good side up.
What's the best way to cut curves in MDF?
For curves, a jigsaw with a fine-toothed blade is ideal. Use a template and guide if possible. For tight curves, make relief cuts up to the line to help navigate the turn. Sand the edges smooth after cutting.
How do you finish cut MDF edges?
Sand the edges smooth with 220-grit sandpaper, then apply a sealer designed for MDF edges. For a smoother finish, you can use wood filler, sand again, and then seal. For edges that will be visible, consider using iron-on edge banding.