


How To Hang A Door | An Easy DIY Guide
Posted by Lee Watkinson on 26th Jun 2025
It's hard enough to choose the style of door for your home let alone hanging a door! Or so you might think. In this easy DIY guide, we're going to show you how to hang a door perfectly - just like a carpenter would!
Before we jump straight in, let's take a look at everything you need for door hanging.
Tools & Materials Required
Whether you're replacing doors or want to fit a new door, you're going to need the following:
Essential Tools
- Door (check out our internal doors)
- Combination square
- Tape measure
- Mallet (or hammer)
- Pencil
- Chisels (various sizes)
Additional Equipment
- Wooden wedge
- Marking gauge
- Plane (smoothing and power)
- Drill (and drill bits)
- Screwdriver (or screwdriver bits for drill)
- Door holder (or someone to help)
If you've got all of these to hand, let's quickly go over another important (and often missed) step.
Hanging A Door - Which Way Does It Go?
Without the appropriate diagram or prior knowledge of the door, it can be difficult to figure out which way the door is intended to be hung.
Don't Hang The Door Upside Down
Make no mistake, it is easy to hang a door upside down. Let's try and avoid that!
Now you'd think it would be obvious, but that's not always the case. With some doors, you can tell which way up they need to be hung just by looking at the design.
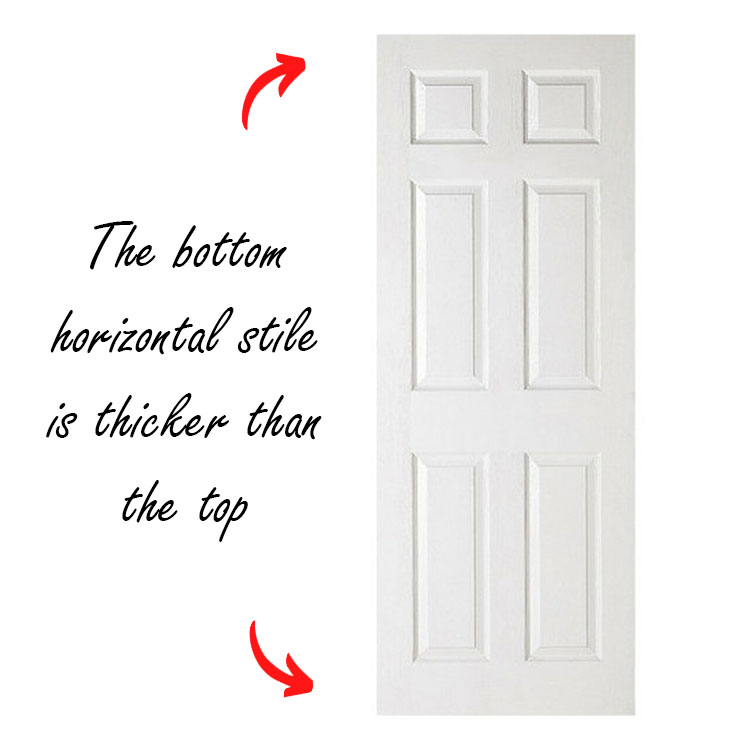
For instance, with four panel and six panel doors the bottom horizontal stile will be taller than that of the top.
Another traditional door style (much like our DX 30's Style White Primed Internal Door) features three slim vertical panels below a single square panel.
If it's a hollow core door that you're hanging, pay attention to where the lock block is situated.
Finding the lock block:
The lock block is a solid piece of timber that is used to secure your latch and lock handles to. It is normally marked on the top of the door but if it is not, there is another way to check.
Simply tap the door with your knuckle. If it sounds hollow, this is your hinge side. If it sounds solid, this is your latch side. This is important to find out before you take steps to hang the door.
Which Way Should The Door Swing?
When it comes to which direction to hang a door, you'll often find that there is only one way for it to open. If it's not clear at first, you need to determine which way the door will swing before hanging it.
- More often than not, the door will swing into the room if it is joined to a hallway
- Consider where the light switch is situated - avoid this being covered by the door when opened
- If you're still unsure, pop the model of the door into Google Images to see which way up it should be hung
Without further ado, let's hang your door!
Hanging Doors - Step By Step
Here's the guide that you're here for - let's learn how to fit an internal door. You'll have them up in no time!
Prepare Door Frame / Lining
Firstly, you'll need to prepare the door frame (or door lining).
If these are newly fitted, make sure they are clean and free of debris. If the walls have been plastered, ensure that any lumps stuck to the frame are removed using a blunt chisel.
If you are fitting a door to an old door frame, it may be best to remove the door stops and sand both stops and the frame to ensure they are nice and smooth.
Professional tip: You'll need to use the combination square and pencil to mark the thickness of the doors edge if your frame doesn't have door stops already (this is usually 35mm or 44mm thick).
Once you've set the square to the correct thickness, use it to mark a line in from the face of the frame at each corner. Make sure the lines start approximately 3 inches away from the top and bottom of the frame as to avoid the hinges.
On these lines, tap in a nail around halfway. This prevents the door falling through during marking up and also keeps it nice and flush.
If you're hanging an Oak door (or something very expensive) and don't want to risk a nail denting it, use a small offcut of timber (or even door stop). Nail this so the edge sits on the line - you're far less likely to damage the door this way.
Mark Up Using The Door
Now, ensuring that the lock block is on the side where the handle is to be fitted, put the door into the frame.
If the door size needs to be reduced in order to be hung in the frame, plane the door down where necessary using a hand plane or an electric plane (depending on how much material you need to remove).
Once the door has been planed to suit, pop it back into the frame. Now raise the door up (using a wooden wedge) so that there is only a 2mm or 3mm gap between the top of the door and the frame.
Consistency tip: To ensure consistency when hanging multiple doors, use cardboard or cut a spacer. If you are hanging the door without carpet or flooring already down, make sure you leave a suitably sized gap at the bottom to allow for this. As an example, you should allow approx. 20mm when planning on fitting carpet and underlay.
Marking The Hinges
Marking The Hinges
If you are hanging the door on an existing frame that already has a hinge position, simply mark these out on the door. Then skip some of the information below until we remove the door from the frame.
If it's a new frame, use the below instructions.
Standard hinge positioning:
- Top hinge: 150mm from the top of the frame
- Bottom hinge: 230mm from the bottom of the frame
- Third hinge: Required for fire doors, hardwood or heavy exterior doors - position in between top and bottom hinges
Tip: mark an 'x' with your pencil on the side of the line where you want the hinge to be (do this on the door and frame). This way you're less likely to remove material from the wrong side of the line!
If you're happy with the markings you've made, remove the door from the lining. Place the door in the door holder hinge side up (alternatively, have your helping hand hold the door in this position for you).
Using the square, square off all of the pencil lines that you made. Make the lines clear but faint - this makes them easier to remove later on.
Now you can place the hinge on the door and draw around it to mark the hinge position. Ensure that the whole rectangular plate of the hinge is touching the door and is parallel. Measure the thickness of the hinge plate and mark this on the door too - this is so you remove the correct amount of material.
Cut Out The Hinge Spaces
When chopping the hinges out, make sure you use a sharp chisel.
Cutting technique:
- Cut the top and bottom line of the hinge horizontally and to the depth of the hinge thickness
- At intervals of 5mm to 10mm, cut 45° degree angle lines between the top and bottom cuts
- Keep within the lines and gently remove the excess material with the chisel
- Repeat this for the remaining hinge spaces
Once you have removed the material, you should be left with the perfect space in which to sit the hinge. Make sure you remove any remaining pencil lines once all the hinges have been cut out.
You can also drill pilot holes for your screws at this point. Simply hold the hinge in position and drill a small hole in the centre of each screw hole. Make sure that the drill bit is thinner and shallower than the screws you plan to use.
Trim The Bottom Of The Door
You may find that you need to plane the bottom edge of the door. Use a handheld plane for small amounts or an electric planer for larger removals.
Leading Edge
It may be necessary to apply a leading edge to the door. This is to prevent it from hitting the frame when closing.
Hang The Door!
You should now be in a position to finally hang the door, step back and admire your handy work!
Installation sequence:
- Lift the door into position and angle it so that the top hinge can be screwed in first
- Screw in the top hinge with just a single screw (in case anything needs adjusting)
- With the single screw holding the door in position, pivot the door down
- Screw in the middle hinge completely, then the bottom hinge
- Once these are screwed in and you are happy with the fit, complete the top hinge
When screwing the hinges on, make sure the screw heads finish flush with the hinge for the best appearance and function.
You've Hung A Door!
Congratulations! You've completed our 'how to hang a door' guide and you should now be standing proudly in front of your newly hung door.
Now it's time for you to get the handles and latch fitted so that the door is complete.
If you still don't feel confident and would rather a professional fit the door for you, we've written another post about the expected cost of hanging a door.
Need quality doors for your project?
Browse our complete range of internal doors, door frames, and hardware to complete your installation.

Lee Watkinson
Digital Marketing Director at Skirting World with 10 years of experience in Home Interiors & Manufacturing.